Electricity and magnetic energy are closely linked. When electric current flows, a magnetic force is created (it’s called electromagnetic energy). And when electromagnetic force changes, electric current is generated. This current can be passed through wire and used to power devices. Let’s try an experiment to see if we can generate electricity using magnetic energy.


Materials you’ll need
 1 x 10 m spool of enamel (polyurethane) wire of approx. φ 0.4 mm
 Several neodymium magnets: Height 6 mm, φ 15 mm
 2 x alligator-clip wires
 1 x 5 mm LED (approx. 2.0 V)
 1 x C-size battery or cylinder of similar size
Tools you’ll need
・Sandpaper (280–400 grain)
・Scissors
・Adhesive cello-tape or similar
Ten meters of wire—the required length for this experiment—is enough to wrap around a C-size battery about 110 times. If you don’t have a C-size battery to use as a wire spool, a plastic film cannister will work as well.


First, we have to make a wire coil. Make your first wrap around the battery about 20 cm down from the end of the wire, and leave it hanging loose. Keep wrapping the wire around the battery until the strand width is about 2 cm. Then wind the wire back over the top of the first layer towards your starting point and repeat until you have about 20 cm of wire left.
If you start rolling the wire too tightly, it will be difficult to pull the battery out later. Wind with gentle pressure to begin with.
Be very careful when handling the enamel wire to avoid injury.


Gently pull the battery out of the coil with 20 cm of wire left from the other end. Twist both sides around the insides of the coil to keep its loops together. Leave a short length at each end of the wire. You can secure the coil into place with a piece of tape. Next, take your sandpaper and rub the ends of your wire (2–3 cm) to completely remove the insulation.
Fold the sandpaper like a sandwich and pinch the wire end inside between your forefinger and thumb. Pull outwards to the end of the wire about 20 times, adjusting the wire in the fold of the sandpaper to properly expose it to the grain.


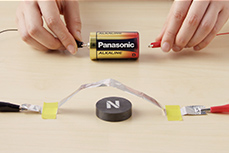
Attach an alligator-clip wire to both ends of your coil. Then clip the opposite ends of your wires onto the legs (terminals) of the LED. Normally, we would have to make sure the positive and negative terminals are connected in the right way, but for this experiment, we don’t need to worry about the polarity.


Make a stack of neodymium magnets one on top of the other and rapidly move them in and out as close as you can to the center of the coil.
Swift magnet motion near the coil is the key to this experiment. It doesn’t matter if the magnet bumps into the coil, just concentrate on moving the magnet around as fast as you can.
Neodymium is a very strong type of magnet, and will slam together when placed near each other. If you have a finger in the way, it can get badly pinched. Naturally, magnets will attract iron, so be sure to keep any sharp iron objects away from your workspace.


If you move the magnet fast enough, electricity is generated. The electrons pass back and forth through the wire and LED device, illuminating it briefly when the magnet is moved towards or away from the coil.
If your LED did not light up, reverse the magnet’s orientation in your hand and try again.


If your LED did not light up…
- Check the ends of the enamel wire. In most cases, the LED won’t light up because some of the insulation remains on the wire. Unclip your alligator leads and rub the wire tags again. Try cutting your sandpaper into a smaller size and fold it in half, rubbing the wire with the roughest areas of the sandpaper. You’ll know you’ve removed the insulation when the bare wire is a goldish color.
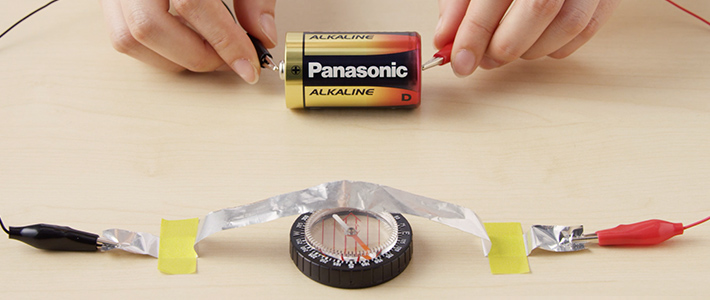
- Check your enamel wire. It may be badly kinked or broken somewhere in the coil, preventing current from flowing. Use a multi-meter to check this easily.


![]() How does a coil and magnet create electricity?
How does a coil and magnet create electricity?
Magnetic force is power created by the magnet’s opposing poles of attraction and repulsion. Magnetic line refers to the directional flow of this force. Magnetic field is the area influenced by magnetic force. Even if metal is placed within a magnetic field, nothing appears to happen. But if we move the magnet (therefore changing the magnetic field), electric current is generated. In our experiment, we rapidly moved the magnet closer to and further away from the metal coil, and the magnetic line moving through the coiled wire increased and decreased correspondingly with the magnet’s motion. In other words, the changes in the magnetic field created electrical current, which flowed through the wire and lit up the LED. This phenomenon is called “electromagnetic induction”.


![]() Can we increase the amount of current?
Can we increase the amount of current?
Electrical current generated by magnetic force inside a wire is very low. That’s why we wrap the wire many times to make the coil, to get the same effect as exposing the coil to magnetic force more frequently. The more wraps in your coil, the greater the amount of electrical current generated. You can also create more current by increasing the amount of magnetic force (i.e. by using a stronger magnet). In our experiment, the LED lit up only for a moment because electric current was generated only when the magnetic force changed—that is, its motion and strength is linked to how fast we can move the magnet.
If the direction of transitioning magnetic force is reversed, the direction of the electric current will be reversed as well. In other words, electric current is created whether the magnet is moving towards or away from the coil. However, the LED can only light up when current flows through the wire from one direction, not both directions. Therefore, it lights up when the magnet is close or far away so long as the magnetic field is being changed by motion.
![]() Battery basics
Battery basics
- Electromagnetic induction is the phenomenon of electric current in wire when magnetic force changes. Power generation is more effective when using a wound wire coil.
![]()
- Make another coil using the same enamel wire, but increase or decrease the length of wire. Observe the effect on the LED. What happens?
- Change the number of neodymium magnets you use and examine the effect on the LED.
- The way the LED lights up changes with the speed of the magnet’s motion. See how fast you can make the magnet move with an adult’s help!


Electromagnetic induction in daily life
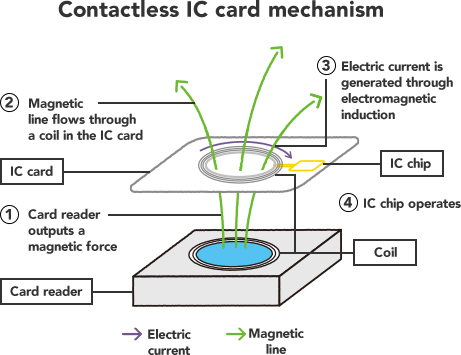
Electromagnetic induction is a very common way to create electricity, and you’ll find it working in all kinds of places. For example, contactless IC cards such as train passes that you place on the gate’s touchpoint sensor don’t have a battery. Same with IC cards that you place on a card-reader to check your bank balance or pay for something. Instead of a battery, coils and magnetic lines in the card and the reader interact, generating enough electricity to power the device. Other examples that use electromagnetic induction include electricity generators, smartphones, and cookers. Electromagnetic induction is everywhere!


- Making the coil correctly is key to a successful experiment. Take time to wind the wire carefully and neatly, and be rewarded with brighter illumination.
- Enamel wire is pre-tensioned on the spool. Once loosened, it tangles easily and is difficult to work with. Do not loosen the entire roll of wire before winding it around the cylinder. Work slowly, untangling and winding little by little.
- The thicker the enamel wire, the smoother the current flow. If you want to replicate the effect of extra windings, use slightly thicker enamel wire than suggested to enhance efficiency.
- General magnets (ferrite magnet/bar magnet) possess weaker magnetic force than neodymium. They have inadequate strength to illuminate the LED, however, you could have the children try them anyway, just to illustrate that powerful magnets are required to generate electricity.